How to use SSH?
1. General information about SSH service
“Secure Shell or plainly SSH is a cryptographic network protocol for operating network services securely over an unsecured network.
SSH provides a secure channel over an unsecured network in a client-server architecture, connecting an SSH client application with an SSH server.”
(More info on SSH can be found HERE)
To use SSH under our services one must generate secure RSA or DSA private/public keypair and add public key to file .ssh/authorized_keys on servers side under own webhosting account.
NB! On cPanel servers You can add/modify/authorize proper keys/keypairs also via cPanel itself!
cPanel -> SECURITY -> SSH Access -> Manage SSH Keys
– To add a key/pair: “Generate new key” or “Import key”
– To authorize/remove SSH accessrights: (after previous step): Under section “Public Keys” on required row, click on either Manage or Delete (as needed).
Publickey can be added via FTP or FileManager (in cPanel) to own webhosting account. (NB! Under cPanel one must add/import publickey via “SSH Access” -> “Manage SSH Keys” and also to authorize it there for access). After that SSH secured access is only granted to person who has privatekey file in his/her computer.
NB! Always when keys are added/imported, please check also file/folder access rights on server side for proper modes:
1 |
chmod 700 ~/.ssh |
2 |
chmod 600 ~/.ssh/authorized_keys |
2. Using SSH under Windows OS
To use SSH under windows one must use program called PuTTY (You can download it from: HERE) Needed programs would be (Installer will install whole package if “by program” install is needed You can download):
– PUTTY (SSH program with GUI for Windows OS)
– PuttyGen (program for generating SSH keys under Windows OS)
– Pageant (automatic keyring for managing/authenticating with public/privete keys)
Generating needed keypairs for SSH under Windows OS
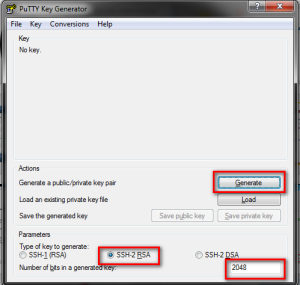
1. After installation/download steps run program PUTTYGEN.EXE
– Key type must be: SSH-2 RSA
Number of bits in a generated key: 2048 (Nowadays 4096 is more recommended!)
After that click Generate
Keypair generation process may require moving mouse cursor – please check on-screen instructions!
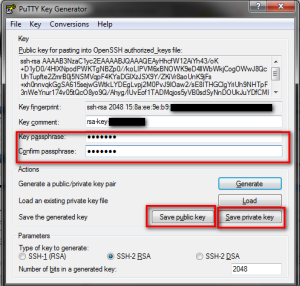
2. If SSH keypairs have been generated please save/export them to secure location in Your computer so that You do not accidentally delete or loose them!.
– For added security please use password to add additional security Your privatekey! (Key passphrase ja Confirm passphrase).
– To export/save keypairs to computer use: Save publik key ja Save private key
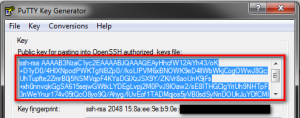
3. SSH publickey (marked via blue background) must be added/copied on servers side to file: .ssh/authorized_keys
– For that please check if folder .ssh exists, if not please do create it. After that do the same wit file authorized_keys – to there please copy text from Your computer from: Public key for pasting into Open SSH authorized_keys file
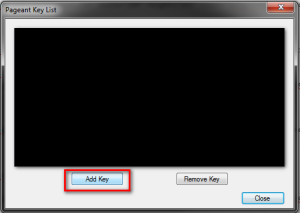
4. Adding SSH privatekey for Pageant (is not needed but is more easy for authentication):
– Open Pageant
– Add Your generated and exported privatekey via “add key” to SSH keys list
NB! Always when keys are added/imported, please check also file/folder access rights on server side for proper modes:
1 |
chmod 700 ~/.ssh |
2 |
chmod 600 ~/.ssh/authorized_keys |
Using SSH under Windows OS
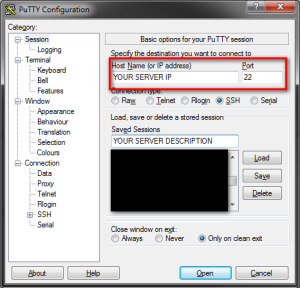
1. Open PUTTY
2. Add/modify needed settings to program/session window (servers IP or domain name would suffice)
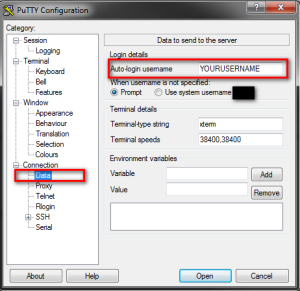
3. Open “Data” in menu and enter Your webhosting account main username (as npXXXXX or rXXXXXX)
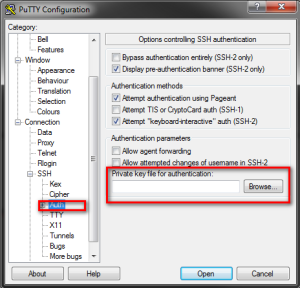
4. Add privatekey fail via (Connection -> SSH -> Auth) submenu
5. Go back to menu item “Session” and save Your settings via button “Save”
New SSH entry is now added and You can use it to authenticate to server via SSH.
3. Using SSH under Linux OS
Generating keypairs and adding them to server
1. Open commandline (Terminal)
2. Generate private and public keypairs:
1 |
~/.ssh |
2 |
ssh-keygen -t rsa -b 4096 -C "key_comment" |
(key_comment <- is not required but I’d recommend to add own comment or e-mail address there!) – Next step is to add filename and password for additional security (it is strongly recommended to add both!):
1 |
Generating public/private rsa key pair. |
2 |
Enter file in which to save the key (/home/<teiekasutajanimi>/.ssh/id_rsa): |
3 |
Enter passphrase (empty for no passphrase): |
4 |
Enter same passphrase again: |
– Needed keypairs are now generated!
3. Copy/add publickey (text entry from file with .pub ending) to server
1 |
cat YOURKEYFILENAME.pub |
(Shows file contents in window)
– For that please check if folder .ssh exists, if not please do create it. After that do the same with file authorized_keys – to there please copy text from window (next lines after “cat” command!)
NB! Always when keys are added/imported, please check also file/folder access rights on server side for proper modes:
1 |
chmod 700 ~/.ssh |
2 |
chmod 600 ~/.ssh/authorized_keys |
Adding privatekey to keyring for authentication
1. You can add privatekey to SSH agent via command:
1 |
ssh-add ~/.ssh/YOURPRIVATEKEYFILENAME |
2. From commandline (Terminal) use:
1 |
ssh -T YOURSERVERNAME |
– If You wish also to authenticate via certain username use:
1 |
ssh YOURUSERNAME@YOURSERVERNAME |